Worker
Workerは、常駐型で動作し続けるカスタムスクリプトをホスティングするサービスです。
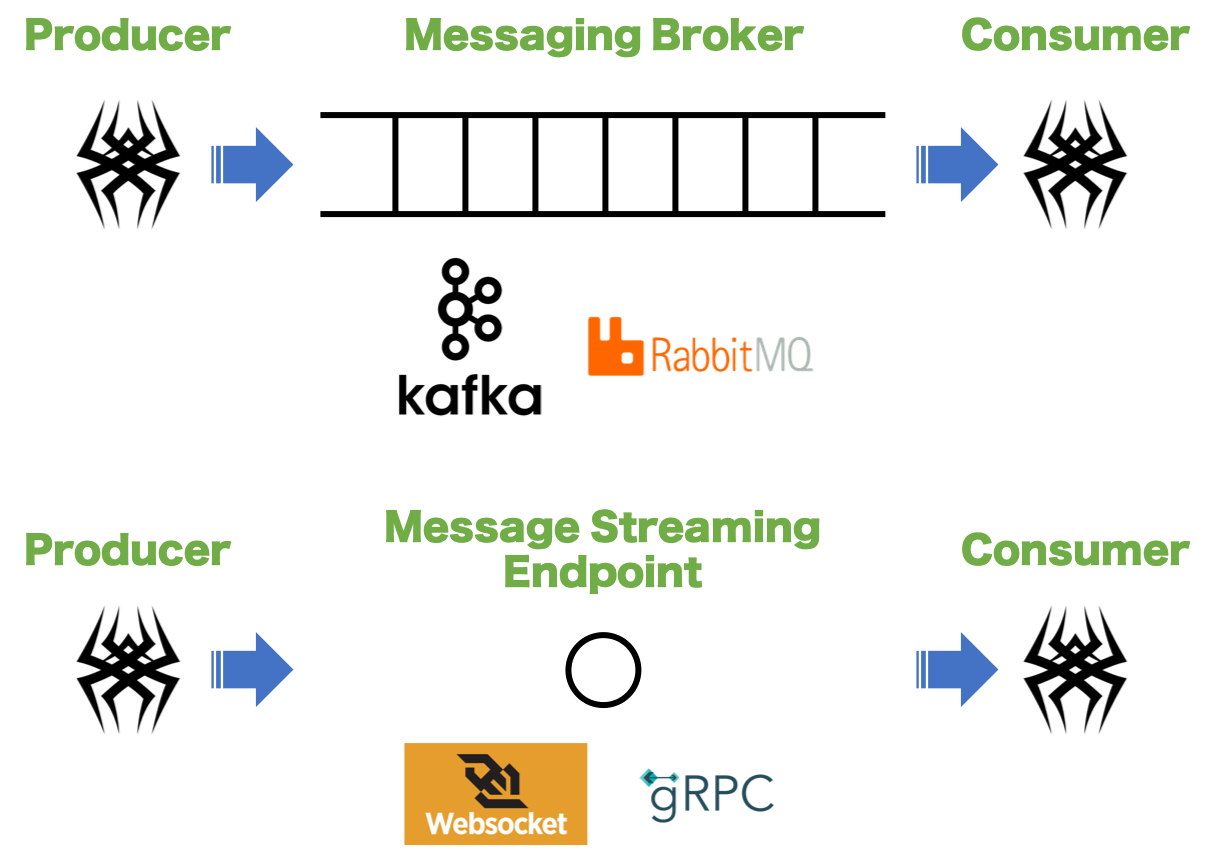
例えばMQ(メッセージキュー)を介して外部システムとインテグレーションするケースでは、MQへのメッセージ送信や、MQをサブスクライブしてメッセージを取り込む必要があります。このような常駐型で動作させたい処理を記述する場合にWorkerを用いて実現することができます。
以下の図に示す通り、KafkaやRabbitMQなどのメッセージングブローカーとの常時接続によるストリーミング処理や、WebSocketやgRPCエンドポイントのようなストリーミングエンドポイントに常時接続する場合に利用します。
Workerが保有する属性
| 属性 | 概要 | 備考 |
|---|---|---|
category |
Workerのカテゴリを指定します。 | カテゴリは単なるラベルです。 |
name |
Workerの名前を指定します。 | ユニークである必要があります。 |
mode |
動作モードを指定します。 | singleとmultiが選択できます。singleモードの場合は、単一のWorkerがmasterノードで実行されます。multiモードの場合は、master/slaveすべてのノードで複数のWorkerが実行されます。 |
script |
常駐型のカスタムスクリプト関数を記述します。 | 無限ループのWorker関数では、ブロッキングしないよう適切に非同期スリープを挿入してください。worker_watch_intervalの周期で再実行されます。 |
サンプル①
以下は、KafkaコンシューマのWorker実装例です。
- name: consumer
  category: example
  mode: multi
  script: |-
    async def consume():
        from aiokafka import AIOKafkaConsumer
        consumer = AIOKafkaConsumer('my_topic', loop=asyncio.get_event_loop(), bootstrap_servers='localhost:29092')
        await consumer.start()
        try:
            async for msg in consumer:
                """TIPS: 組み込み関数qprintで出力するとREPLのデバッグモードで受信データをダンプできます
                """
                qprint("topic=%r partition=%r offset=%r key=%r value=%r timestamp=%r" % (msg.topic, msg.partition, msg.offset, msg.key, msg.value, msg.timestamp))
        except:
            return
        finally:
            await consumer.stop()
Note
本サンプルを実行するには、aiokafka(https://github.com/aio-libs/aiokafka)ライブラリをインストールする必要があります。
aiokafkaは、Qmonus SDKの標準インストールには含まれていないため、利用する場合はプラグインのリポジトリにrequirements.txtを置いてaiokafkaのversionを指定してご利用ください。
以下は、KafkaプロデューサーのWorker実装例です。プロデューサーの場合は、データベースでキューテーブルを作成し、ScenarioやATOMなどでキューテーブルにエントリしたデータをWorkerで刈り取ってMQに送信するような実装が想定されます。
- name: producer
  category: example
  mode: single
  script: |-
    async def produce():
        from aiokafka import AIOKafkaProducer
        producer = AIOKafkaProducer(loop=asyncio.get_event_loop(), bootstrap_servers='localhost:29092')
        await producer.start()
        try:
            await producer.send_and_wait("my_topic", b"Hello, kafka!!")
        finally:
            await producer.stop()
Note
本サンプルはConfluent社が公開しているDocerイメージ confluentinc/cp-kafka:7.6.1 (Apache Kafka® 3.6) にて動作確認済みとなります。
サンプル②
以下は、Amazon SQSコンシューマのWorker実装例です。
- category: example
  mode: single
  name: SQSConsumer
  script: |-
    async def consume():
        import aiobotocore
        import botocore.exceptions

        config = await get_service_config("handson", mu_conversion=True)
        session = aiobotocore.get_session()
        async with session.create_client("sqs", region_name=config.region,
                                                aws_secret_access_key=config.aws_secret_access_key,
                                                aws_access_key_id=config.aws_access_key_id) as client:
            queue_url = None
            try:
                response = await client.get_queue_url(QueueName=config.sqs_queue_name)
                queue_url = response["QueueUrl"]
            except botocore.exceptions.ClientError as err:
                # キューが存在していない場合は作成して終了
                if err.response["Error"]["Code"] == "AWS.SimpleQueueService.NonExistentQueue":
                    qprint("%r queue does not exist" % config.sqs_queue_name)
                    response = await client.create_queue(QueueName=config.sqs_queue_name)
                    queue_url = response["QueueUrl"]
                    qprint("Created new %r" % queue_url)
                    return

            while Runtime.running():
                try:
                    response = await client.receive_message(QueueUrl=queue_url, WaitTimeSeconds=2,)
                    if "Messages" in response:
                        for msg in response["Messages"]:
                            qprint(MU(json.loads(msg["Body"])).yaml_format)

                            """ここで取り込んだメッセージを処理してください。
                            """

                            await client.delete_message(QueueUrl=queue_url, ReceiptHandle=msg["ReceiptHandle"])
                    else:
                        """キューが空の場合は終了
                        """
                        break
                except:
                    break
Note
本サンプルを実行するには、https://github.com/aio-libs/aiobotocoreライブラリをインストールする必要があります。
Note
上記AWSのシークレット情報は、configサービスで定義している例です。
動作確認のためにSQSにデータを挿入する場合は、以下のようにfunctionsを作成してください。
category: example
name: SQSProducer
code: |-
  async def SQSProducer(message):
      import aiobotocore
      config = await get_service_config("handson", mu_conversion=True)
      session = aiobotocore.get_session()
      async with session.create_client("sqs", region_name=config.region,
                                              aws_secret_access_key=config.aws_secret_access_key,
                                              aws_access_key_id=config.aws_access_key_id) as client:
          response = await client.get_queue_url(QueueName=config.sqs_queue_name)
          await client.send_message(QueueUrl=response["QueueUrl"], MessageBody=json.dumps({"message": message}))
REPLでの動作確認
debugモードでSQSProducerからSQSにメッセージを送信するとWokerがSQSからメッセージを取り込んでREPLに出力します。
>>> debug()↵
Disconnected the currently subscribed channel and connected to the debug channel ['xaas.southbound.channel']
debug channel connected
>>> await context.SQSProducer("Hello, SQS!!")↵
... ↵
↵
message: Hello, SQS!!
>>> await context.SQSProducer("Hello, Qmonus!!")↵
... ↵
↵
message: Hello, Qmonus!!
>>> debug(False)↵
debug channel disconnected
>>>
サンプル③
以下は、Google Cloud PubSubサブスクライバーのWorker実装例です。
- category: example
  mode: single
  name: CloudPubSubConsumer
  script: |-
    async def consume():
        import os
        from gcloud.aio.pubsub import SubscriberClient
        from gcloud.aio.pubsub import subscribe
        from gcloud.aio.pubsub.metrics_agent import MetricsAgent
        from aiohttp.client_exceptions import ClientResponseError

        config = await get_service_config("handson", mu_conversion=True)

        topic_name = "projects/%s/topics/%s" % (config.gcp_project_id, config.gcp_pubsub_topic)
        subscription_name = "projects/%s/subscriptions/qmonus_subscriber" % config.gcp_project_id

        async def callback(message):
            data = None
            try:
                data = json.loads(message.data)
            except:
                return

            qprint(json.dumps(data, indent=4))

            """ここで取り込んだメッセージを処理してください。
            """

        async with aiohttp.ClientSession() as session:
            client = SubscriberClient(session=session, service_file=os.path.join(os.getcwd(), config.credential_json))
            try:
                await client.create_subscription(subscription_name, topic_name)
            except ClientResponseError as e:
                if e.status != 409:
                    return

            await subscribe(subscription_name, callback, client, num_producers=1,
                                                                 max_messages_per_producer=10,
                                                                 ack_window=0.3,
                                                                 num_tasks_per_consumer=1,
                                                                 enable_nack=True,
                                                                 nack_window=0.3,
                                                                 metrics_client=MetricsAgent())
Note
現在、Googleが提供している純正のPythonクライアントではメインスレッドをブロックしてしまうため、asyncioに対応したライブラリもしくはGCPのAPIを直接叩く必要があります。
本サンプルを実行するには、https://github.com/talkiq/gcloud-aioをインストールする必要があります。requirements.txtには、gcloud-aio-pubsub==4.3.3を追記してください。
Note
上記GCPのシークレット情報は、configサービスで定義している例です。
動作確認のためにGoogle PubSubにデータをパブリッシュする場合は、以下のようにfunctionsを作成してください。
category: example
name: CloudPubSubPublisher
code: |-
  async def CloudPubSubPublisher(message):
      import os
      import aiofiles
      from google.auth import jwt
      from google.cloud import pubsub_v1

      config = await get_service_config("handson", mu_conversion=True)

      service_account_info = None
      async with aiofiles.open(os.path.join(os.getcwd(), config.credential_json), "rb") as f:
          content = await f.read()
          service_account_info = json.loads(content)

      audience = "https://pubsub.googleapis.com/google.pubsub.v1.Subscriber"
      credentials = jwt.Credentials.from_service_account_info(service_account_info, audience=audience)

      publisher_audience = "https://pubsub.googleapis.com/google.pubsub.v1.Publisher"
      credentials_pub = credentials.with_claims(audience=publisher_audience)
      publisher = pubsub_v1.PublisherClient(credentials=credentials_pub)

      topic_name = 'projects/{project_id}/topics/{topic}'.format(project_id=config.gcp_project_id, topic=config.gcp_pubsub_topic,)
      future = publisher.publish(topic_name, json.dumps({"message": message}).encode("utf-8"))
      qprint(future.result())
Note
パブリッシュをテストする上記functionsは、Google純正のPythonクライアントを使用して記述されています。requirements.txtには、google-cloud-pubsub==2.3.0を追記してください。ちなみにgcloud-aio-pubsubでもパブリッシュは可能です。
REPLでの動作確認
debugモードでCloudPubSubPublisherからPubSubにメッセージを送信するとWokerがPubSubからメッセージを取り込んでREPLに出力します。
>>> debug()↵
Disconnected the currently subscribed channel and connected to the debug channel ['xaas.southbound.channel']
debug channel connected
>>> await context.CloudPubSubPublisher("Hello, PubSub!!")↵
... ↵
↵
2110470892620895
message: Hello, PubSub!!
>>> await context.CloudPubSubPublisher("Hello, Qmonus!!")↵
... ↵
↵
2110470131286800
message: Hello, Qmonus!!
>>> debug(False)↵
debug channel disconnected
>>>
Note
Worker関数は処理対象がない場合は極力関数を終了させてワークロードを解放することを推奨します。Worker関数が終了した場合でも起動パラメータ--worker_watch_intervalの間隔で自動的に再実行されます。デフォルトは、10sec間隔です。